Every profile gets a full set of daily targets, worked out from its age, sex, life stage, body size and activity level. Most people never need to change them. When you do, they all live in one place: Targets.
A target row holds up to two numbers — a target (the amount to reach) and a max (the amount to stay under). Macros and food groups are shown on the diary summary as a group; every other nutrient is switched on one at a time. A Targets table opens every nutrition report so the headline numbers are in one place.
Open the Targets editor
- From the profile's diary, select Profile in the header.
- Next to Targets, select Edit. The dialog opens on a short list; each row opens a panel.
- Make your changes, then select Save. Targets save on their own; you do not need to save the profile as well. Closing with ✕ offers to discard anything unsaved.
Macros
Energy, protein, carbohydrate and fat. Energy is the first row: leave its Custom switch off and the figure is worked out from the profile's age, sex, height, weight and activity level; switch it on and type your own. Everything else on this panel is measured against it, so changing energy moves the other three.
A Grams / % of energy switch at the top of the panel sets which unit the rows are in, and each row is kept in the unit you set it in. Type grams and grams are what is stored. Flip to % of energy and the share is what is stored, so the grams are worked out again whenever the energy requirement moves. The side you used last is remembered and the panel opens on it, targets and maxes together. The three shares do not have to total 100%: a split that leaves part of the day unclaimed saves like any other and the line under the bar says so — 75% of energy targeted — doesn't total 100%. That bar shows the split you have ended up with. One Show in diary summary switch puts all four macro tiles on the diary summary, or takes them off.
Food groups
Daily serves for the Australian Dietary Guidelines food groups, with the energy those serves add up to in the line above the table. Extras is the exception: it has a max and no target, because there is no recommended minimum intake of these foods — Extras is a limit, not a goal. One Show in diary summary switch puts the whole row of food-group tiles on the diary summary, or takes them off.
This panel only appears for profiles on a food database that includes food group data; not every database does. Serve targets you saved are kept if you switch database and come back.
Nutrients
Every other nutrient in the profile's food database, grouped the way the diary groups them. Energy, protein, carbohydrate and fat are not here — they live on the Macros panel, and the food groups live on their own. Opening one of the four from the diary and selecting Edit takes you to the Macros panel rather than editing it in place, because a macro is only meaningful beside the other three. Each row has its own Show switch.
The fields on a row
- Target — the daily amount to aim for. Blank means there is no reference for this profile (alcohol has no daily goal, only a limit).
- Max — the amount to stay under. Blank means no upper limit applies (thiamin, for example).
- Custom — on means the numbers are yours to edit; off means Foodzone keeps them on the recommended values for the profile. Switching Custom off restores the defaults, so it is also the reset.
- Show — one switch per row, nutrients only. Macros and food groups switch as a group wherever you flip them: the panel's own switch and the Show switch inside a tile's detail dialog both move the whole set.
A max is never a goal: the summary bar aims at the daily target, and the max stays silent there until intake crosses it — then the bar turns red. Select the row to see both numbers at once. Where a row carries a max, its detail dialog draws a zone track instead of a plain fill — green from target to max as the range to sit in, red past the max, both figures ticked and labelled — so the ceiling is visible well before you reach it. A row with a max and no target reads as a limit throughout.
Reset to defaults at the foot of each panel resets that panel's rows. There is no all-at-once reset — each panel owns its own.
Where each default number comes from is set out in How your targets are worked out, and the references behind them in Nutrient reference values explained.
Targets in the report
The Targets table appears right under the report header, one row per shown nutrient:
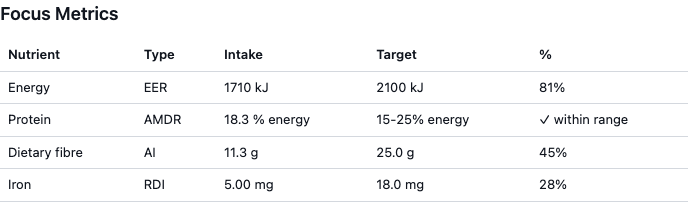
- Type — where the target comes from: Custom for your numbers, or the reference value used (EER for energy, RDI, AI and so on).
- Intake — the average daily intake over the reported days.
- Target and % — the target and how much of it the intake covers.
- Macronutrients without a custom target are judged against their recommended share of energy (AMDR) instead, and the row shows the range with a status: within range, below min or above max.
The full nutrient sections further down the report are unaffected — the Targets table is a summary, not a filter.